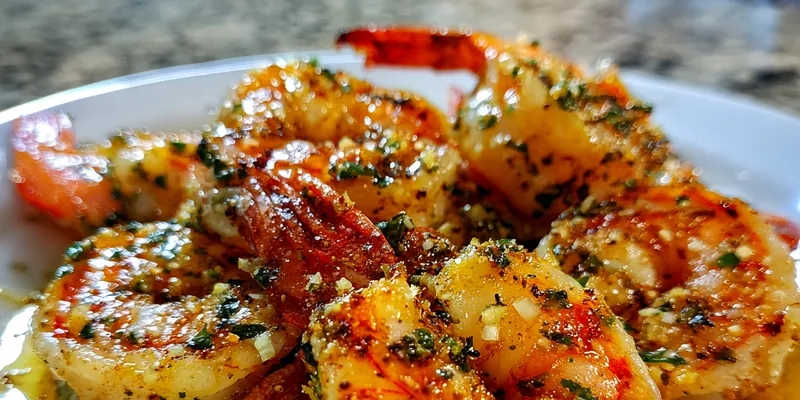
Crispy Garlic Butter Shrimp
Crispy Garlic Butter Shrimp combines the rich, savory flavors of garlic and butter with perfectly cooked shrimp, creating a dish that's both indulgent and satisfying. This recipe is quick and easy, making it ideal for weeknight dinners or special occasions alike. The crispy outer layer adds a delightful texture, while the garlic butter infuses every bite with mouthwatering flavor. Serve it over rice or with a side salad for a complete meal that’s sure to impress your family and friends.

Why This Crispy Garlic Butter Shrimp Works
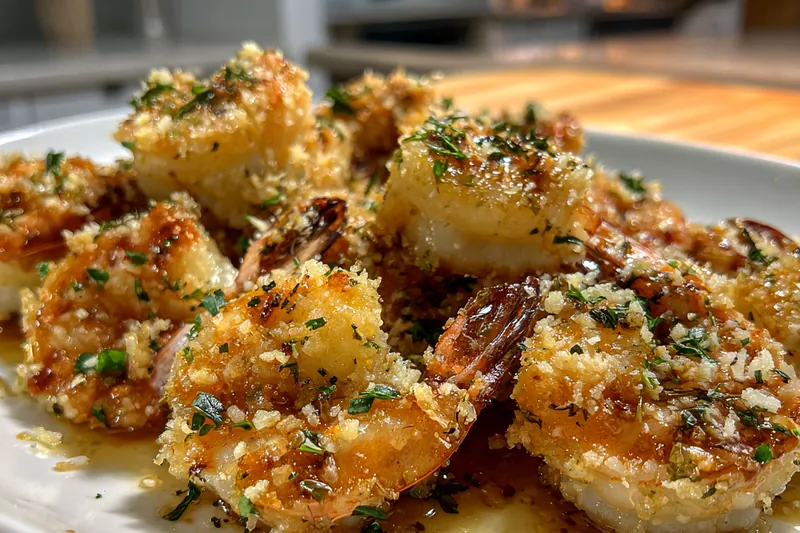
The technique behind Crispy Garlic Butter Shrimp lies in the perfect balance of seasoning and cooking method. By dredging the shrimp in flour and breadcrumbs, you create a crunchy exterior that contrasts wonderfully with the tender shrimp inside. The key is to ensure that the oil is hot enough before adding the shrimp; this prevents them from absorbing too much oil and becoming greasy. Additionally, the garlic butter sauce adds depth of flavor, enhancing the overall appeal of the dish.
What makes this recipe special is its versatility and the ability to adjust the flavors to your liking. The combination of garlic and butter is timeless, while the addition of spices such as red pepper flakes brings an exciting kick. This dish can easily be paired with various sides, making it suitable for any occasion, from casual family dinners to elegant gatherings. The quick preparation time means you can whip it up even on the busiest days, ensuring that you never have to sacrifice flavor for convenience.
💡 Professional Tip
For the best results, make sure to use a high-quality shrimp that is fresh or properly frozen. The size of the shrimp also matters; larger shrimp tend to hold up better during cooking and provide a more satisfying bite. When frying, avoid overcrowding the pan, as this can lower the oil temperature and lead to soggy shrimp. Lastly, consider garnishing with additional herbs or a squeeze of lemon for a refreshing finish.
Frequently Asked Questions
Yes, you can prepare the shrimp ahead of time by breading them and storing them in the refrigerator until you're ready to cook. This allows for a quick dinner option later on. However, it’s best to fry them right before serving to maintain their crispiness. If you need to refrigerate the cooked shrimp, reheat them in the oven to restore some of the crunch.
If you're looking for substitutes, you can replace shrimp with chicken or tofu for a different protein source. Additionally, for a gluten-free option, use almond flour or gluten-free breadcrumbs instead of regular flour and breadcrumbs. You can also experiment with different spices, such as adding lemon pepper or Old Bay seasoning for a unique twist on the classic flavor.
The shrimp are done when they turn pink and opaque, usually taking about 2-3 minutes on each side. Additionally, they should be firm to the touch and slightly curled. If you have a meat thermometer, the internal temperature should reach 120°F (49°C). Avoid overcooking, as this can make the shrimp rubbery.
Yes, you can freeze the breaded shrimp before frying them. Place them in a single layer on a baking sheet until frozen, then transfer to a freezer bag. When you're ready to cook, there’s no need to thaw; simply fry them directly from frozen, adjusting the cooking time as needed. However, it's not recommended to freeze cooked shrimp, as they may lose their texture.
Crispy Garlic Butter Shrimp pairs wonderfully with a variety of sides. Consider serving it over a bed of fluffy white rice or quinoa to soak up the delicious garlic butter sauce. A fresh green salad or steamed vegetables also complement the dish nicely, adding brightness and crunch. For a heartier option, garlic bread or pasta can make for a satisfying meal.
Cooked shrimp can be stored in an airtight container in the refrigerator for up to 2 days. It's best to consume them sooner for optimal freshness and flavor. If you have leftover breaded but uncooked shrimp, they can be kept in the refrigerator for about 24 hours before frying. Always ensure that any leftovers are stored properly to maintain quality.
Absolutely! You can adjust the spice level by adding more or less red pepper flakes according to your taste preferences. For a milder version, simply omit the red pepper flakes altogether. Alternatively, if you enjoy more heat, consider adding a dash of cayenne pepper or using a hotter pepper, such as jalapeño or serrano, in the garlic butter sauce.
The best way to reheat Crispy Garlic Butter Shrimp is in the oven. Preheat your oven to 350°F (175°C) and spread the shrimp on a baking sheet. Heat for about 10-15 minutes or until warmed through and crispy again. Avoid using the microwave, as it can make the shrimp soggy and lose their delightful crunch.
Recipe Troubleshooting Guide
Too Dry
Problem: If your shrimp turn out too dry, it may be due to overcooking.
Solution: To avoid this, keep a close eye on the shrimp while frying and use a timer. Aim for that perfect pink color and remove them from the heat as soon as they reach that point.
Not Crispy
Problem: Shrimp may not turn out crispy if they were not dredged properly or if the oil was not hot enough.
Solution: Make sure to coat the shrimp evenly in flour and breadcrumbs and check that the oil is hot enough before adding the shrimp. A good rule of thumb is to test the oil with a small piece of bread; if it sizzles immediately, it's ready.
Overcooked
Problem: Overcooked shrimp can become tough and rubbery.
Prevention: Always keep an eye on them while cooking, as shrimp cook quickly. Use a timer for each side and take them out as soon as they turn pink and opaque.
Undercooked
Problem: Undercooked shrimp will look translucent and may pose a food safety risk.
Recovery: If you suspect that your shrimp are undercooked, return them to the pan for another minute or two until they are fully cooked through and opaque.
Burnt
Problem: Shrimp can burn if the oil is too hot or if they are left in the pan for too long.
Prevention: Keep the heat on medium-high and adjust as necessary. If you notice the shrimp starting to brown too quickly, lower the heat immediately.
Flavor Balance
Too Sweet: If the dish tastes too sweet, it might be due to the shrimp or sauce components.
Too Salty: To balance out saltiness, add a squeeze of lemon juice or a touch of sugar to counteract it.
Bland: If the shrimp taste bland, consider adding more spices or herbs after cooking to enhance the flavor.
Key Ingredients
The main ingredient in this recipe, shrimp, is not only delicious but also packs a punch of protein. Opt for large shrimp for the best texture and flavor. Fresh shrimp is always preferred, but if frozen, ensure they are properly thawed before cooking. The shrimp should be peeled and deveined to ensure a clean and pleasant eating experience. This dish showcases the natural sweetness of the shrimp, which is enhanced by the seasonings and garlic butter sauce.
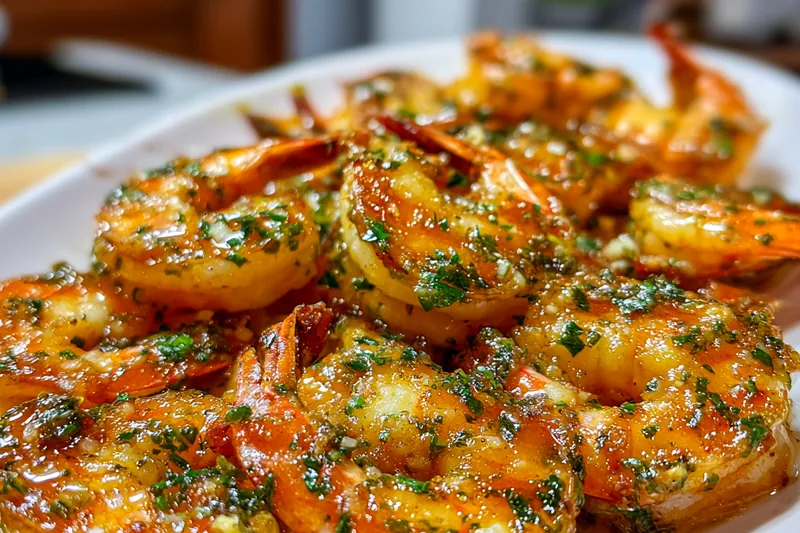
When it comes to seasonings, garlic is the star of the show. Freshly minced garlic provides a robust flavor that works beautifully with butter. Smoked paprika adds depth and a hint of smokiness, while red pepper flakes introduce a mild heat. The combination of these flavors creates a harmonious blend that elevates the shrimp. Finally, fresh parsley not only adds a pop of color but also contributes a fresh, herbaceous note to the dish.
Essential Ingredient Notes
- Main Ingredient: Choose high-quality, fresh shrimp for the best results. Look for shrimp with a firm texture and a mild ocean scent. If using frozen shrimp, ensure it is properly thawed and drained before cooking. The size of the shrimp can also affect cooking time, so adjust accordingly.
- Second Key Ingredient: Butter is essential for the rich flavor and the base of the garlic sauce. Using unsalted butter allows for better control of the seasoning. For added depth, consider using a combination of butter and olive oil for frying. This not only enhances the flavor but also helps achieve that golden-brown color.
- Essential Seasoning: Garlic is a vital ingredient that should be used fresh for maximum flavor. Avoid using pre-minced garlic, as it loses its potency. The addition of smoked paprika brings warmth and complexity, while red pepper flakes can be adjusted according to your heat preference. Together, these seasonings create a delightful blend that complements the shrimp perfectly.
Cooking Process
The cooking process for Crispy Garlic Butter Shrimp is straightforward and quick. After preparing the shrimp and setting up your breading station, the key is to fry them in hot oil to achieve that coveted crispiness. Ensure the oil is adequately heated before adding the shrimp; this allows for an even cook and prevents them from becoming greasy. Don’t overcrowd the pan, as this can drop the oil temperature, leading to soggy shrimp.
Once the shrimp are fried to a golden brown, the next step is to create the garlic butter sauce in the same skillet. This method infuses the flavors together, making the dish even more delicious. Finally, tossing the fried shrimp in the garlic butter ensures each bite is packed with flavor before serving. Don't forget the finishing touches of lemon juice and fresh parsley, which brighten the dish beautifully.
Key Technique
The key technique to achieving perfect Crispy Garlic Butter Shrimp lies in the frying process. Ensuring that the oil is at the right temperature is crucial for a crispy exterior. Additionally, using a two-step breading method helps create a crunch that holds up even after being tossed in sauce. Timing is also essential; shrimp cook quickly, and removing them from the heat at the right moment ensures they remain juicy and tender inside.
Crispy Garlic Butter Shrimp
📋 Ingredients
Main Ingredients
- 4 tablespoons unsalted butterfor the garlic butter sauce
- 4 cloves garlic, mincedadds rich flavor
Sauce/Seasoning
- 1 pound large shrimp, peeled and deveinedmain protein
- 1/2 cup all-purpose flourfor dredging
- 1/2 cup breadcrumbsfor the crispy coating
Instructions
Prepare the Shrimp
Rinse the shrimp under cold water and pat them dry with paper towels. This step is crucial for achieving that crispy texture. In a bowl, combine the shrimp with salt, black pepper, and smoked paprika to season them evenly.
Set Up Breading Station
In one shallow dish, place the flour. In another dish, whisk together the breadcrumbs and red pepper flakes. This two-step breading process will give the shrimp a delightful crunch.
Recipe Notes & Tips
Storage Tips
To store leftovers, place the shrimp in an airtight container in the refrigerator. They will remain fresh for up to 2 days. If you know you won't eat them within that time, consider freezing the breaded but uncooked shrimp. This way, you can enjoy them at a later date without losing quality.
Serving Ideas
Crispy Garlic Butter Shrimp can be served with a variety of sides. Consider pairing it with garlic bread to soak up the delicious butter sauce or over a bed of rice or pasta. A fresh, crisp salad adds a nice contrast and balances the richness of the shrimp. For an elegant touch, serve the shrimp with lemon wedges and a sprinkle of fresh herbs.
Variations
Feel free to customize this recipe to your liking! You can add different spices or herbs to the breadcrumb mixture for unique flavors. For a healthier twist, consider baking the shrimp instead of frying them. You can also try adding some grated Parmesan cheese to the breadcrumbs for an extra layer of flavor.